
Tags
Installing the BizTalk ESB Toolkit 2.1
Posted on January 9, 2013 by connecsys
Follow this simple step-by-step guide to get the BizTalk ESB Toolkit 2.1 up and running.
- Browse to http://www.microsoft.com/en-us/download/details.aspx?id=11847 and click the download button for the “BizTalk ESB Toolkit 2.1-x64.msi” file. The setup wizard opens up and guides you through the install process.
- Be sure to select the Samples when you intend to install the ESB Management Portal.

ESB Installation Wizard
- Accept the setup wizard’s remaining defaults and click the Install button.
- Navigate to the root folder of the ESB Toolkit install located at C:\Program Files (x86)\Microsoft BizTalk ESB Toolkit 2.1 and open “Installation Guide.htm”. “Installation Guide.htm” provides step by step instructions for installing and configuring the ESB Toolkit.

Installation Prerequisites
- Review the required and optional install prerequisites. Ensure they are all successfully installed before proceeding.
- Pay special attention to the IIS 6 extensions that must be installed. Browse to the Administrative Tools and ensure “Internet Information Services (IIS) 6.0 Manager” is listed next to “Internet Information Services (IIS) Manager” (when sorted alphabetically). If so, skip the following top-level task. If “Internet Information Services (IIS) 6.0 Manager” is not installed, perform the following sub-tasks.
- Open Server Manager.
- Click on the Roles item in the left hand navigation.
- Scroll down to the “Role Services” section in the content view and click the “Add Role Services” hyperlink.
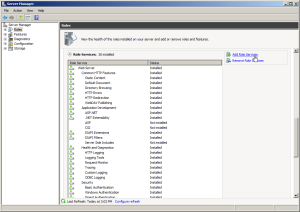
IIS Roles
- Scroll down and select the “IIS 6 Management Compatibility” item.
- Click the Next button and then click the Install button.
- Click the Close button after the successful installation of the IIS 6 extensions.
- Pay special attention to SQL Server Analysis Services and ensure it is installed for BAM Aggregations support required by the ESB Management Portal. If Analysis Services was not already installed, then after installing, be sure to complete the following tasks for BAM Aggregations support.
- Open the BizTalk Server 2010 Configuration utility.
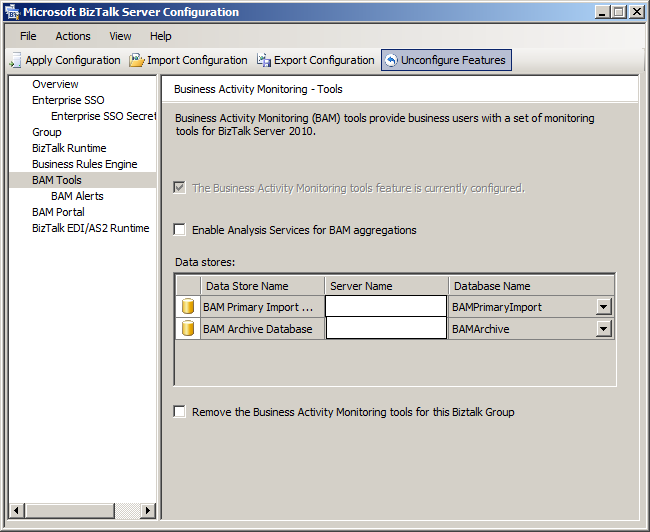
- Click on the “BAM Tools” item on the left hand navigation.

BizTalk BAM Configuration Before
- Click to check the “Enable Analysis Services for BAM aggregations” checkbox. Notice the following 2 data store records are added in the main content data grid: BAM Analysis Database and BAM Star Schema Database.
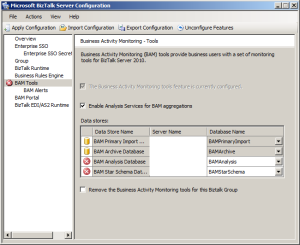
BizTalk BAM Configuration After
- Enter the correct analysis server instance name for the BAM Analysis Database record’s “Server Name” field.
- Enter the correct database server instance name for BAM Star Schema Database record’s “Server Name” field.
- Click the “Apply Configuration” button on the toolbar to complete the configuration.
- Click Next and accept the defaults, click the Finish button and close the BizTalk Server Configuration utility.
- Pay special attention to Microsoft Chart Controls for .NET Framework 3.5 and ensure it is installed. If not, perform the following sub-tasks to install it.
- Browse to http://www.microsoft.com/en-us/download/details.aspx?id=14422 and click the Download button for the MSChart.exe file.
- Execute MSChart.exe.
- Click Next and accept the defaults until the install completes successfully.
- Click the Finish button to close the install wizard.
- Pay special attention to the Visual Studio 2010 Software Development Kit and ensure it is installed if the Itinerary Designer is required.
- Browse to http://www.microsoft.com/en-us/download/details.aspx?id=2680 and click the Download button for the VsSDK_sfx.exe file.
- Execute VsSDK_sfx.exe.
- Pay special attention to the Windows SDK for Windows 2008 and ensure it is installed. If not, perform the following sub-tasks to install it.
- Browse to http://www.microsoft.com/en-us/download/details.aspx?id=11310 and click the Download button for the Setup.exe file.
- Execute Setup.exe.
- Click Next and accept the defaults except for the “Installation Options” screen.
- Deselect all options except for “Developer Tools”. In the future, it will be good to identify exactly which features of the Windows SDK are required for the ESB Management Portal.
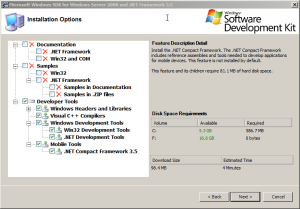
Windows SDK
- Click the Finish button after the SDK is successfully installed to close the install wizard.
- Pay special attention to Microsoft UDDI Services 3 and ensure it is installed if UDDI services are required. If not, perform the following sub-tasks to install it.
- Browse to http://www.microsoft.com/en-us/download/details.aspx?id=10030 and click the Download button for the BizTalk2009_UDDIServices30_EN.exe file.
- Execute BizTalk2009_UDDIServices30_EN.exe.
- Extract the files to a suitable location, such as C:\Program Files (x86)\Microsoft UDDI Services 3.
- By default Setup.exe will automatically execute to display the install wizard.
- Click the “Install Microsoft UDDI Services on this computer” hyperlink.
- Click Next accepting the defaults and click the Install button.
- Click the Finish button to close the install wizard.
- The Microsoft UDDI Services Configuration wizard is displayed.
- Choose the “Basic Configuration” option, enter the required information and click the Configure button.


Installing and Configuring the Core
- Install the ESB Toolkit
- Import the MSI located at “C:\Program Files (x86)\Microsoft BizTalk ESB Toolkit 2.1\Microsoft.Practices.ESB.CORE64.msi” using the BizTalk Administration console.
- Open the BizTalk Server Administration console.
- Right-click on the Applications node, in the left hand navigation, and select Import -> “MSI file …”
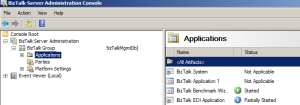
BizTalk Applications
- Click the ellipses button and select the MSI file to import, located at “C:\Program Files (x86)\Microsoft BizTalk ESB Toolkit 2.1\Microsoft.Practices.ESB.CORE64.msi”.
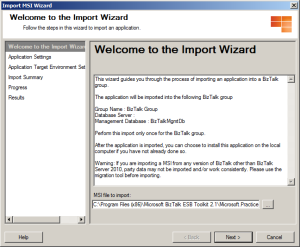
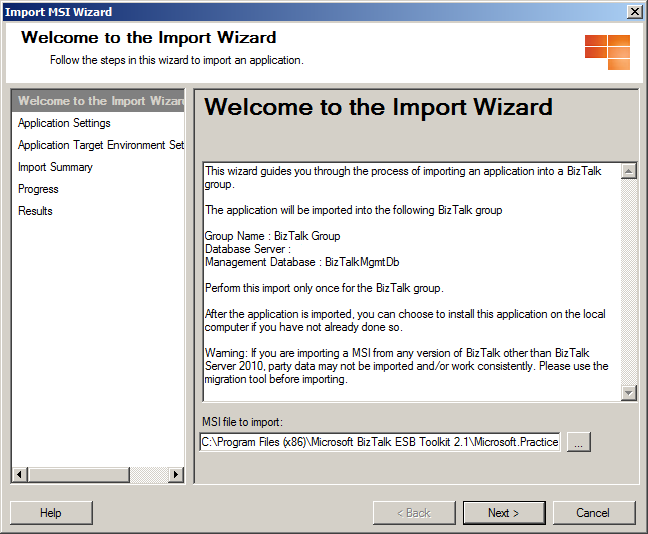
BizTalk Application Import Wizard Begin
- Click Next accepting the defaults and click the Import button.
- Install the MSI by enabling the “Run the Application Installation Wizard …” checkbox and clicking the Finish button. Or simply double-click the install located at “C:\Program Files (x86)\Microsoft BizTalk ESB Toolkit 2.1\Microsoft.Practices.ESB.CORE64.msi”.

BizTalk Application Import Wizard Complete
- Click Next accepting the defaults and click the Close button.
- Configure the BizTalk ESB Toolkit.
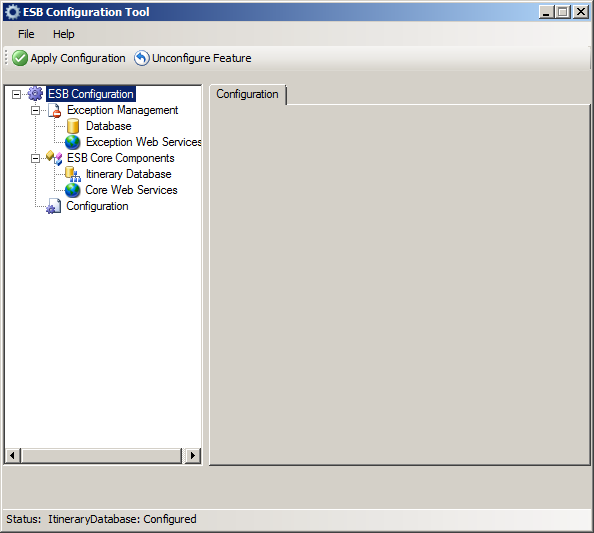
- Double click the ESBConfigurationTool.exe located in “C:\Program Files (x86)\Microsoft BizTalk ESB Toolkit 2.1\Bin”.
- Expand the left hand navigation items as seen in the image below.

ESB Configuration Tool – Initial
- Click on the Database navigation node located under the “Exception Management” navigation node.
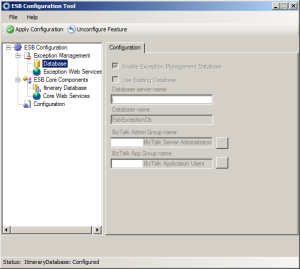
ESB Configuration Tool – Exception Management Database
- Enable the “Enable Exception Management Database” checkbox and enter valid information into the text boxes listed below the checkbox.
- Click the “Apply Configuration” button.
- Click the “Exception Web Services” navigation node under the “Exception Management” navigation node.
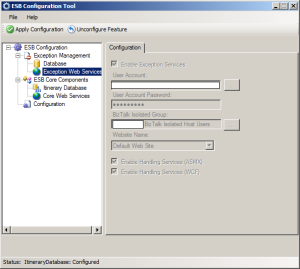
ESB Configuration Tool – Exception Web Services
- Enable the “Enable Exception Services” checkbox and enter valid information into the text boxes listed below the checkbox.
- Click the “Apply Configuration” button.
- Click the “Itinerary Database” navigation node under the “ESB Core Components” navigation node.

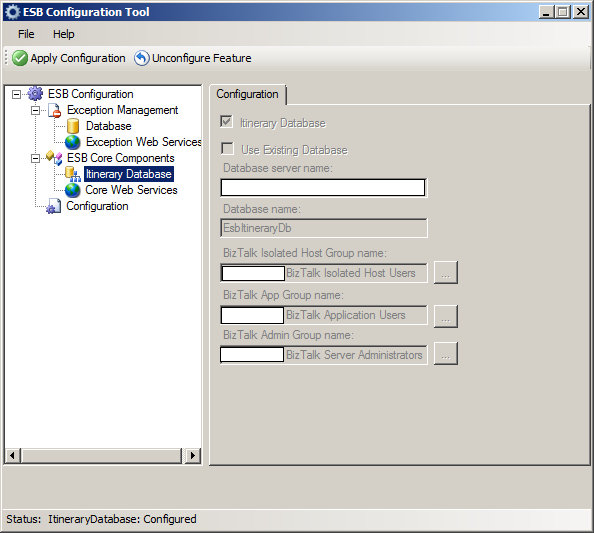
ESB Configuration Tool – Itinerary Database
- Enable the “Itinerary Database” checkbox and enter valid information into the text boxes listed below the checkbox.
- Click the “Apply Configuration” button.
- Click the “Core Web Services” navigation node under the “ESB Core Components” navigation node.
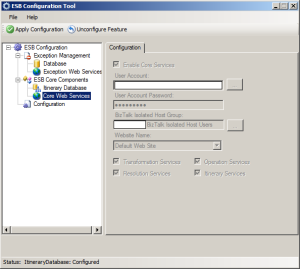
ESB Configuration Tool – Core Web Services
- Enable the “Enable Core Services” checkbox and enter valid information into the text boxes listed below the checkbox.
- Click the “Apply Configuration” button.
- Click the Configuration navigation node.
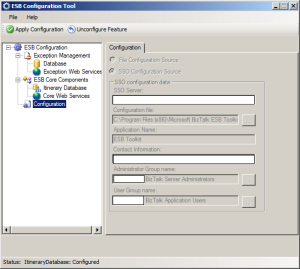
ESB Configuration Tool – SSO Configuration
- Select the “File Configuration Source” radio button if the BizTalk ESB Toolkit is being installed on a BizTalk Group with a single application server. Select the “SSO Configuration Source” radio button if the BizTalk ESB Toolkit is being installed on a BizTalk Group with multiple application servers.
- Enter valid information into the text boxes listed below the radio buttons.


Extending the Core
-
Install BAM Definitions
- Open a command prompt and change the directory to “C:\Program Files (x86)\Microsoft BizTalk Server 2010\Tracking”.
- Execute the following command to install the itinerary activities:
- Bm.exe deploy-all -DefinitionFile:”C:\Program Files (x86)\Microsoft BizTalk ESB Toolkit 2.1\Bam\Microsoft.BizTalk.ESB.BAM.Itinerary.xml”
- Execute the following command to install the exception activities:
- Bm.exe deploy-all -DefinitionFile:”C:\Program Files (x86)\Microsoft BizTalk ESB Toolkit 2.1\Bam\Microsoft.BizTalk.ESB.BAM.Exceptions.xml”
- Install the ESB Management Portal
- Unzip “C:\Program Files (x86)\Microsoft BizTalk ESB Toolkit 2.1\ESBSource.zip” to C:\Projects\Microsoft.Practices.ESB. Evidently, the management portal code is dependent on the C:\Projects\Microsoft.Practices.ESB location but there is a registry entry where this can be changed. Ensure the Keys and Source folders are directly under the Microsoft.Practices.ESB folder.
- Remove the read-only attribute on the C:\Projects\Microsoft.Practices.ESB folder so the samples install correctly.
- Add a signing key, named Microsoft.Practices.ESB.snk, to “C:\Projects\Microsoft.Practices.ESB\Keys”.
- To turn on unrestricted acess for PowerShell, execute the following command using the PowerShell 32-bit and 64-bit consoles:
- set-executionpolicy unrestricted
- Open a command prompt using “Run as administrator”
- To ensure the WCF script maps are registered, execute the following command:
- %WINDIR%\Microsoft.NET\Framework\v4.0.30319\ServiceModelReg.exe -r
- Execute the Management_Install.cmd located in “C:\Projects\Microsoft.Practices.ESB\Source\Samples\Management Portal\Install\Scripts”.
- To ensure the WCF script maps are registered, execute the following command:
- Open SQL Server Management Studio and connect to the SQL Server instance that hosts the ESB databases. Open the SQL script “ESB.Administration Database.sql” from the “Source\Samples\Management Portal\SQL” folder into a new Query window and execute it to create the EsbAdmin database.
- Open and edit the web.config located at “C:\Projects\Microsoft.Practices.ESB\Source\Samples\Management Portal\ESB.Portal”.
- Set the customErrors mode attribute to “Off”.
- If you’re using a database server instance other than the default instance of the server hosting the ESB portal, update the AdminDatabaseServer connectionString to use the correct database server instance.
- Update the following web.config files, located in each of the dependent services, to use the correct database server instance.
- C:\Projects\Microsoft.Practices.ESB\Source\Samples\Management Portal\ESB.Exceptions.Service\ESB.Exceptions.Service\web.config
- C:\Projects\Microsoft.Practices.ESB\Source\Samples\Management Portal\ESB.BAM.Service\ESB.BAM.Service\ESB.BAM.Service\web.config
- Ensure the default service file (svc or asmx) can be successfully accessed/browsed for the following 3 services:
- ESB.BAM.Service
- ESB.BizTalkOperationsService
- ESB.Exceptions.Service
- Open the ESB.Portal solution and ensure it builds successfully.
- Attempt to browse to default.aspx located in the web application’s root.
- Congratulations assuming the page loads successfully.
- If an exception is returned, use the information to debug the ESB.Portal solution code and identify the cause. The portal should load successfully as long as the 3 services above are browsable, the database connection strings are correct and the portal solution builds.
Quote: http://connecsys.wordpress.com/2013/01/09/installing-the-biztalk-esb-toolkit-2-1-2/
